PyBitmessage Help
Welcome to the help page for PyBitmessage.
Contents
Clarification
PyBitmessage is the official client, used as protocol reference. It is usually abbreviated "Bitmessage", causing confusion between the protocol and the client.
Initial setup
PyBitmessage can be downloaded from the Main Page, either as Windows binary or as source from github. Other builds (for example for Mac OS X) can be found in the forum. The client sets up itself completely automatic. It can be launched and the required files for its operation are created if they do not exist.
Daily usage
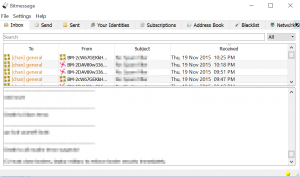
PyBitmessage will automatically connect to other clients on start up, the user does not needs to wait for this to complete and can instantly send messages. POW can be made if offline. The Main interface contains the following tabs:
Inbox
The inbox contains all your received messages (top part) and displays the currently selected message (bottom part). The bottom window allows copying and editing the message but it will not be saved. The context menu in the message list provides additional features, such as HTML view, save as text file and a reply option. Using the HTML view renders some HTML tags from the message, for example images. Messages that are no longer needed can be sent to the trash with the [DEL] key.
Send
The "Send" tab is used to compose new private or Broadcast messages. A message can be dedicated to multiple people but the protocol supports only one receiving address per message. Example: Sending a message to 8 people will generate the exact same message 8 times in the "Sent" tab.
Sent
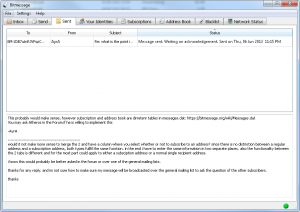
The sent tab displays messages sent by the user, including messages that are in the process of proof of work. The status column displays the current status of the message. Table with the most common messages:
| Status | Description |
|---|---|
| Doing work necessary to send <type>... | POW is being done |
| <type> sent on <date/time> | The message has been sent |
| Waiting on Acknowledgement | The message has been sent but the receiver has not received it yet. Not applicable for broadcasts |
| Acknowledgement received on <date+time> | The receiver got the message. Not applicable for broadcasts |
Messages can be sent to the trash with the [DEL] key however, this will not stop POW from being made if it has already started.
Your Identities
Contains a list of all addresses stored in keys.dat and allows to generate new ones. The context menu allows to enable/disable addresses. Addresses can be labeled, this label is then displayed instead of the address. Labels are not sent over the network and are only visible to the client. Addresses cannot be deleted directly in this tab, but removing the Address Block from keys.dat removes it. Editing the keys.dat file requires the user to shut down the client first.
Subscriptions
Contains a list of all broadcasts, that the client will receive. To receive broadcasts its address must be added first to the list. The context menu allows enabling, disabling and deletation of addresses.
Address Book
Can be used to associate addresses with labels for easier recognition. The context menu allows the user to add a subscription to the address.
Blacklist/Whitelist
Addresses can be blacklisted or whitelisted. The Operation mode of the list (whitelist or blacklist) ban be set too. The context menu allows entries to be enabled, disabled or deleted.
Network Status
Shows the Stream number and the number of connected nodes in a list. Displays when it was started and how much information has been processed yet. Detailed information about the icon color and how to get a green icon can be found here
DML Addresses
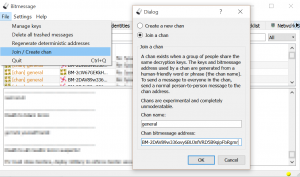
A DML Address can be either created or joined in the File > Join / Create chan menu. These addresses are written with orange color in the identities tab.
To learn more about how to use a DML Address / chan, visit this article. You need to either create the address or join it to send messages to it, else the client gets stuck when waiting for the public key. To resolve this issue, without joining or creating an address see, the DML article.
Join
To Join a DML, the address and the passphrase is required. The passphrase is used to generate the private keys, that the client needs to send and receive messages. The address is used so the user does not needs to know the stream number and address version. If the address is not known, a DML can be created, even if it actually exists, in the hope, that the resulting address is correct.
Create
Creating a DML/chan only requires a passphrase. It will create the address and mark it as such.
Notes
There is no technical difference between creation and joining. Joining requires the address to make sure, you actually get the correct private keys, because they depend on stream number and address version, which are both included in the address. Creating an address however will always use the newest address version and stream number and thus may create a different address, which is not compatible with the one intended to join.
Configuration
Bitmessage can be configured by editing keys.dat or by using the menu Settings > Settings in the GUI.
Settings Menu
The settings menu has the folowing tabs:
User Interface
Allows customization how bitmessage is started and if it should run in portable mode or not.
Willingly include...
Willingly include unencrypted destination address when sending to a mobile device
This option must be enabled, when using DML addresses and is a work in progress feature for mobile app support and has nothing to do with the user interface.
Interface language
This option is currently (at least in the compiled windows version) not fully working but allows to set the language of the client.
Network Settings
Allows setting of the TCP port used for incomming connections. This can be left at default value for most users. A proxy server can be defined if the user wishes to do so. Supports SOCKS4a and SOCKS5 with Authentication support. The option to allow incoming connections can be enabled if the user wishes to help the network, even when using a proxy. Incoming connections are not routed over the socks proxy!
Demanded Difficulty
The demanded difficulty allows to increase the amount of POW to be done for other clients to send messages to the user. POW for users in the address book is always 1. Doubling the number doubles the amount of time required.
The value for small difficulty defaults to 1.0, rthe value for large difficulty to 2.0 (since version 0.4.0)
Max acceptable difficulty
Similar to the "demanded difficulty" tab, this tab has the exact same textboxes, however, they are used to limit the amount of POW the user is willing to do. If he sends a message and the destination address wants him to do more POW than he set as maximum, the message will not be processed. The user can click with the right mouse button on the message and force it to be sent or he can delete the message.
Database cleanup
The database (messages.dat) can be cleaned and shrinked manually with the menu File > Delete all trashed messages. The database is compacted once every month automatically without deletion of trashed messages.
Statistics
Time
On an average computer, different processes take different amounts of time.
| Action | Time required |
|---|---|
| Generate an address | 1 second* |
| Generate an address (1 or 2 characters shorter) | 5 minutes* |
| Sender do work necessary to send broadcast | 2 minutes |
| Sender do work necessary to send person-to-person message | 4 minutes |
| message (or acknowledgement data) propagate through the network | 10 seconds |
Note that on Linux and OSX systems, Bitmessage can often do work much faster as it is able to use all available cores and a faster hashing module.
* After this step is done, the client will silently do work to send out the public key over the network which will take about 2 minutes.


